Google Analytics Events
Your OptInMonster data shows up in Google Analytics through Event tracking. If you’ve ever had to untangle Google Analytics Events before, you’ll know how painful it can be. If your Events have shared the same text as others before, you’ll also know how tricky it is to extract what you need. Both of these are reasons why this post exists.
Knowledge is Power
By integrating OptInMonster with Google Analytics, not only do we get insights into which campaigns are working, we also get to see how that relates to our website (and future customers that visit it).
OptInMonster uses Google Analytics Events to give us this extra layer of information. Normally, if you start using Events without a strategy in place, things can get very confusing (very quickly). Untangling Events in Google Analytics is not a pleasant process.
The good news is that OptInMonster auto-populates it’s event fields for us. Saving an immense amount of time.
In this post, we’ll run through how to lock down our OptInMonster Events insights so that our beautiful lead generation data doesn’t get all muddied up. And the best part? It’s infinitely scalable.
You’ll be able to exclusively segment all OptInMonster Event engagement in Google Analytics. And it’s only going to take one small step (around 5 minutes to do) whenever we publish a new campaign.
Free Google Ads Audit
TRANSFORM YOUR AD PERFORMANCE TODAY!
3 tailored high-impact recommendations. No obligation. Free of charge.
Events in Google Analytics
Google Analytics gives us page level data out of the box. But when we want to know what’s happening within those pages (when the URL doesn’t change), we need to use Events.
Events can be used to keep tabs on softer conversions so that goals in Google Analytics are reserved only for the most valuable ones. They can also give us really useful information on how future customers are interacting with our site. This helps us make data led decisions on whether or not our site is giving visitors what they need and converting them optimally.
Google Analytics Events have three key fields:
- Action – the action performed (click / impression / play / conversion etc.)
- Category – the family of event actions (button / video / forms etc.)
- Label – the event’s name, usually many more unique entries compared with the action and category fields
How these are best used is open to interpretation and there’s no such thing as a one-size-fits-all approach.
OptInMonster Google Analytics Integration
We all know Google Analytics is a great system for understanding our website and how potential customers use it. And at a price point of £0, the value for money is insane.
Some of the key things we use Google Analytics to help understand include:
- Knowing where people are visiting from
- What content they’re interacting with
- What they’re not interacting with
- What’s leading them to convert from an anonymous web session into a contactable lead
- What’s making them leave without doing anything
As mentioned earlier, we can learn a lot more from their interaction with different objects on our site (buttons, links, features, images, videos, etc.) using Events. And we can review the performance of our OptInMonster campaigns with these in mind.
Every time someone views an OptInMonster campaign on your website (and you’ve integrated Google Analytics), it’s going to fire an impression Event. If someone then converts (provided you haven’t changed the settings) a conversion event will be fired.
How OptInMonster Auto-populates Google Analytics Events
OptInMonster auto-populates Google Analytics Events as follows –
- Action: impression OR conversion
- Category: {{ campaign name }}
- Label: {{ campaign id }}
Let’s use this in an example. The image below is what we’d see in the WordPress plugin. We’ve created and published a campaign called ‘Sidebar (Main)’.

- Campaign name: Sidebar (Main)
- Campaign ID: ksblqn7iqpgs6f8kj6f5
Once live, we know that there are going to be two Events triggered in Google Analytics.
#1 – Every time the display settings are triggered and someone sees the campaign, this one (impression) is going to fire:
- Action: impression
- Category: Sidebar (Main)
- Label: ksblqn7iqpgs6f8kj6f5
#2 – Whenever someone carries out the intended action, which is usually submitting their details; the conversion event will fire (providing we haven’t changed the settings):
- Action: conversion
- Category: Sidebar (Main)
- Label: ksblqn7iqpgs6f8kj6f5
Guaranteeing Scalability
Here’s a question. What if we need to use “impression” or “conversion” as an event action for something else? Uh oh.
In all honesty, it’s unlikely. But if it did happen, our insights would now be unusable. There would be no way to see what was OptInMonster and what wasn’t because we couldn’t filter by impression or conversion anymore (as campaign name and ID are unique to every campaign).
So what do we do?
Our answer is to add a View Filter and use the ‘search and replace’ function to update some of the text in our events.
We recommend using the Campaign ID (Event Label) as it doesn’t tell us as much as the Campaign Name (Event Category) at a glance. You know, being an alpha-numeric code and all that.×
Pro Tip
you can find the Campaign ID from the WordPress plugin as shown before, or within OptInMonster itself by clicking edit on the campaign and looking at the URL as below.
Our preferred option was to add “om-” at the beginning of each Campaign ID in the Event Label. So “ksblqn7iqpgs6f8kj6f5” becomes “om-ksblqn7iqpgs6f8kj6f5“.
Let’s run through exactly how we did it.
Free Google Ads Audit
TRANSFORM YOUR AD PERFORMANCE TODAY!
3 tailored high-impact recommendations. No obligation. Free of charge.
Using View Filters To Search And Replace Text In Google Analytics Events
Pro Tipyou should already have 3 views set up in your Google Analytics account for All Data, Live, Testing. Try doing this in your test view first to make sure it’s going to work as expected.
Remember we need to do this for every campaign we have live, and every time we set a new one live. It’s often a good idea to include it as part of your go live routine, or to draw up a checklist.
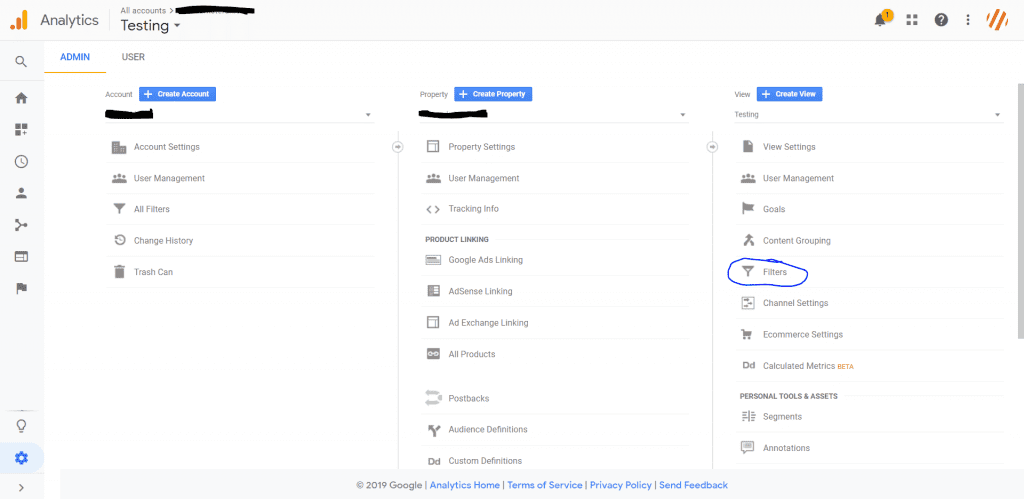
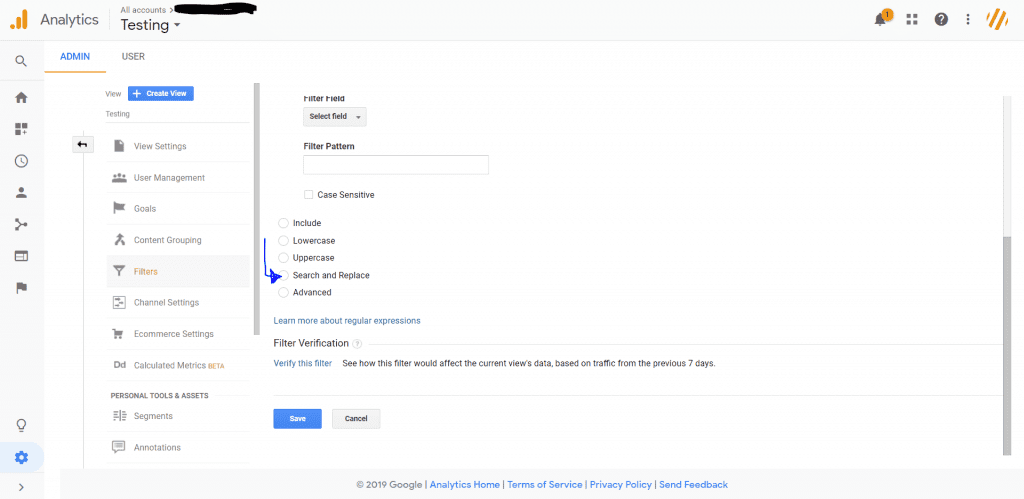
Log into Google Analytics, click Admin > View / Filters
Admin is the gear icon bottom left and the View level filter is the third one.
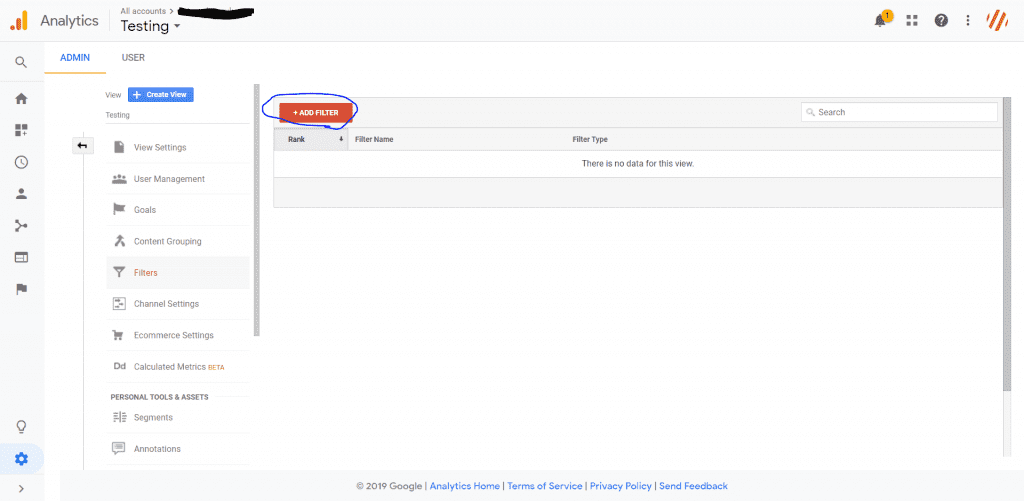
Select ‘Add Filter’
Switch Filter Type from ‘Predefined’ To ‘ Custom’
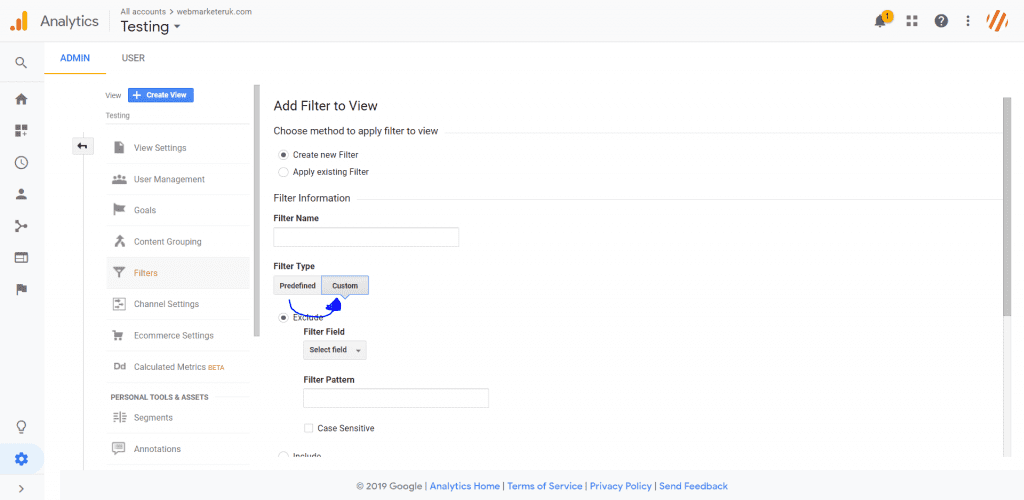
Scroll Down And Check ‘Search And Replace’
Fill In The Details And Save
- Filter Field: Event Label
- Search: {{ Campaign ID }}
- Replace: om-{{ campaign ID }}
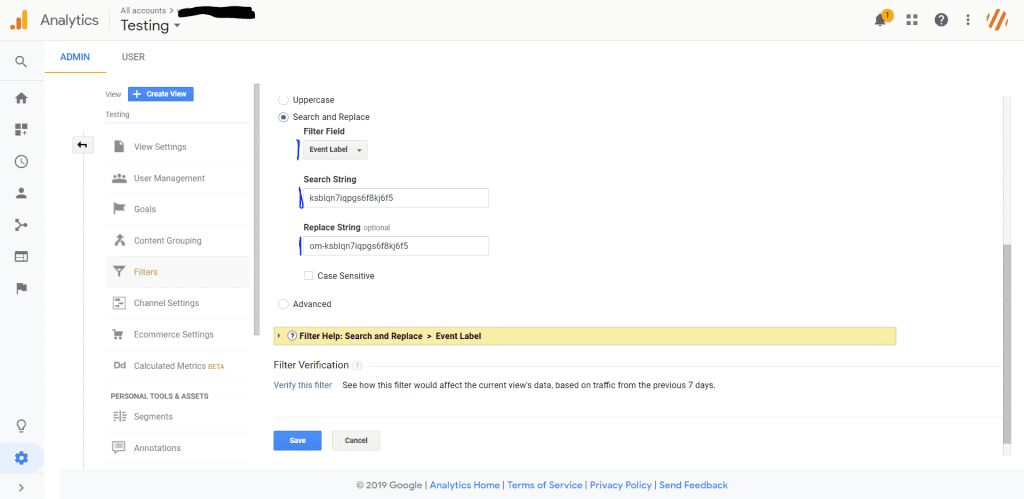
Remember to check your results in Google Analytics and repeat these steps in your live view if all is as expected.
Create Segments To Analyse Sessions With & Without OptInMonster Activity
Now we’ve made the Event data scalable, let’s make it so that we can analyse it against pretty much any other insights in Google Analytics.
This will only work after following the steps above to add om- to the event label.
Here’s the long way (you’re going to love the quick way) –
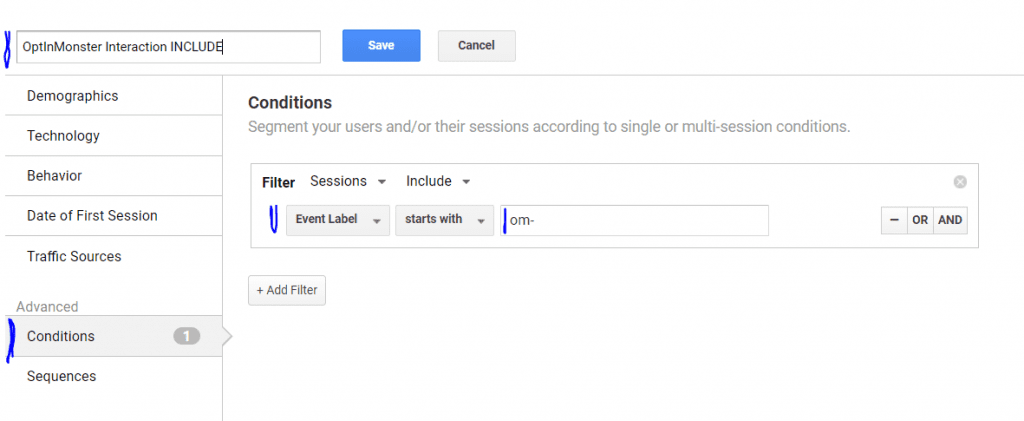
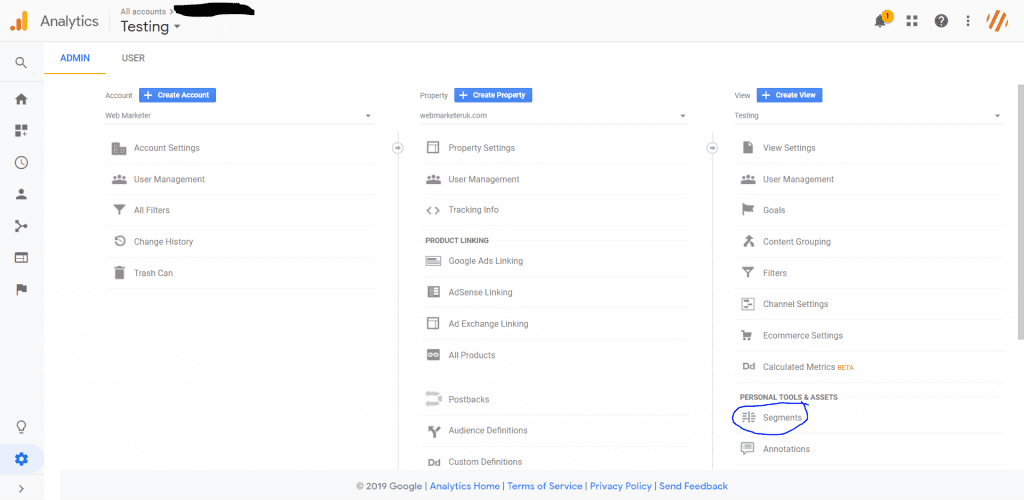
From The Admin Panel, Click Segments (In The View Column) > + New Segment
 Create An Include Segment
- Enter name – we called it OptInMonster Interaction INCLUDE
- Click ‘Conditions‘ in the left-most column
- Click the dropdown and select ‘Event Label’
- Change contains to ‘starts with‘
- Type “om-” in the text field
- Click Save
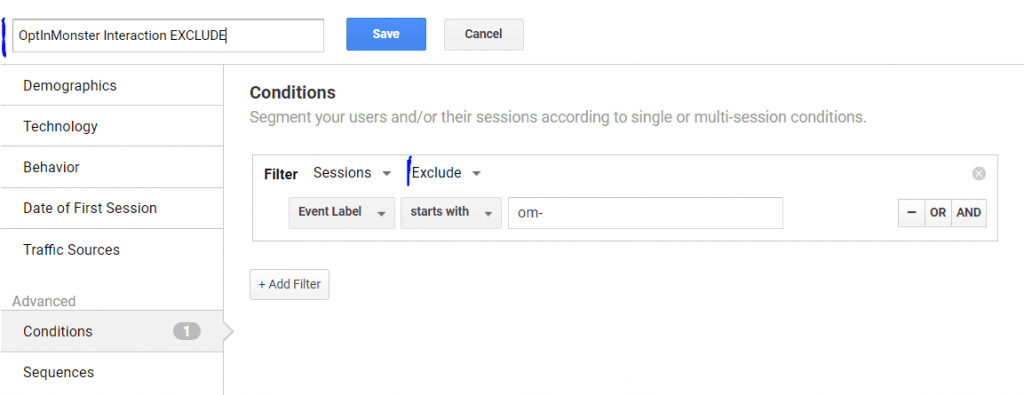
Create An Exclude Segment
- Enter name – we called it OptInMonster Interaction EXCLUDE
- Click ‘Conditions‘ in the left-most column
- Click the dropdown and select ‘Event Label’
- Change contains to ‘starts with‘
- Change the Include dropdown (next to Sessions) to ‘Exclude‘
- Type “om-” in the text field
- Click Save
The Quick Way
Click the buttons below to import these segments in your own Google Analytics without setting anything up yourself. Sharing segments doesn’t share any data – it just means you don’t have to create the segments as per the steps above.
Get In Touch Today
Drive more enquiries, build your sales pipeline and convert new customers.
Sound good? Drop us a line!
